Custom Volume Definition
Similar to the Custom Gas Cloud option, users can set custom volumes for any variable. For example, in some indoor ventilation scenarios, the volume of a room with less than 0.1 m/s velocity needs to be determined for how much of a room is stagnant. Another example for fire simulations may be to calculate the volume above a certain radiation intensity. There are many applications this can be used for, the below goes through the steps for adding and reviewing multiple custom volumes for an internal ventilation case.
Define A Custom Volume from the Volume Analysis Window
To define a custom volume, a simulation needs to be completed and a monitor region defined. If only a ventilation has complete, then only post-processing variables for ventilation simulations will be available (streamwise velocity, velocity magnitude, mean age-of-air, wind chill, etc). Other post-processing variables will be available when dispersion or fire simulations complete.
-
From the Project menu, select Volume Analysis or select the cloud icon (
 ) from the toolbar
 -
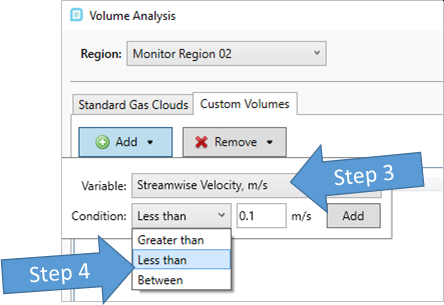
Click the Custom Volumes tab and select the Add button

-
Choose the Variable for the custom gas cloud, this example will use Streamwise Velocity, m/s
-
Set the Condition for the range of the variable to calculate: Greater than, Less than and Between options are available. Choose Less Than and enter a value of 0.1m/s and click Add.
-
You will be prompted if you want to update the data now, click yes to view the results.

This process can be repeated for other variables and ranges, each new custom volume will appear as a new column. To remove a created volume, click the remove button and select the volume to remove from the project and choose Yes on the prompt that appears.
Define A Custom Volume from the Dispersion Simulation Definition Panel
Custom Volumes can also be defined from the Advanced dropdown when setting up a dispersion simulation. Here you can define the volume prior to running any simulations, however only ventilation post-processing variables will be shown. After a dispersion has started calculating other post-processing variables can be utilized for your custom volume.
-
From the Add Items tab, select Dispersion Simulation from the dropdown menu.
-
Expand the Advanced panel and in the Custom Volumes section, select the Add button
-
Set the Variable to Flammable Gas Volume Fraction, %LFL. For this example the flammable gas volume fraction is used but this can be set to any variable applicable to your project, such as H2S ppm or Temperature °C
-
Choose a Condition for the volume, for this example pertaining to %LFL set the condition as Between and enter a value of 10 to 60 in the corresponding fields. This will report the volume of gas between 10% LFL and 60% LFL for the simulated dispersions.
-
Click the Add button and the entered custom volume will be shown in the table.
-
Multiple custom volumes can be defined in this way and listed in the advanced dropdown. Here another 2 volumes were added:

-
Setup the ventilation and inflow for the dispersion and click the Add Items button. When the simulation completes, open the Volume Analysis window from the Project Menu and the entered volumes will be listed in the custom volumes tab.
