Adding Monitor Regions
A monitor region provides information about calculated gas cloud data and ventilation data within the bounds of the defined volume. Monitor regions can be added at any point during the project, if the simulation has not completed then it will not appear in the Gas Cloud Analysis window nor Ventilation Analysis Window.
Follow the steps below or watch this video for how to define a monitor region for your project:
A monitor region is defined by selecting two opposing points of a cuboid, as shown in the figure below. Points can be chosen via the pick tool or manually entered in the coordinate text boxes.

Tutorial 3 - Figure 22 - Example of two points used to define a monitor region.
The following steps will go over adding three monitor regions to the current project. The first will encompass the entire CAD geometry, a second will encompass the flanges in the middle of the facility, and a third around the smaller horizontal vessel and leak source.
-
From the Add Item tab, select Monitor Region from the Select Item dropdown menu.
-
Set the Name to "Facility Monitor Region”
-
Leave the Type to Standard Box. As of v3.21 you may add more advanced shapes for the monitor region.
-
For Point 1 use the pick tool
 and select the southeast lower corner of the CAD geometry. Figure 23 below shows the pick tool choosing the southeast corner point. Alternative ways to define the monitor region are:
-
Manually enter the coordinate "(25, -20, 0)", this will ensure your results match this tutorial.
-
Use the Quickbox option, the red arrow button
 , which defined a cuboid shape in three clicks, described here.
-
-
For the second defining point, click the arrow button
next to the Point 2 coordinate text boxes and choose the lower northwest corner of the CAD geometry, also shown in Figure 23. We are using this method to get the X and Y coordinates for each point and then enter a value of "12" for the Z coordinate, as it is difficult to pick a point in 3D space without a reference. You may also manually enter the values of "(-38, 45.5, 12)"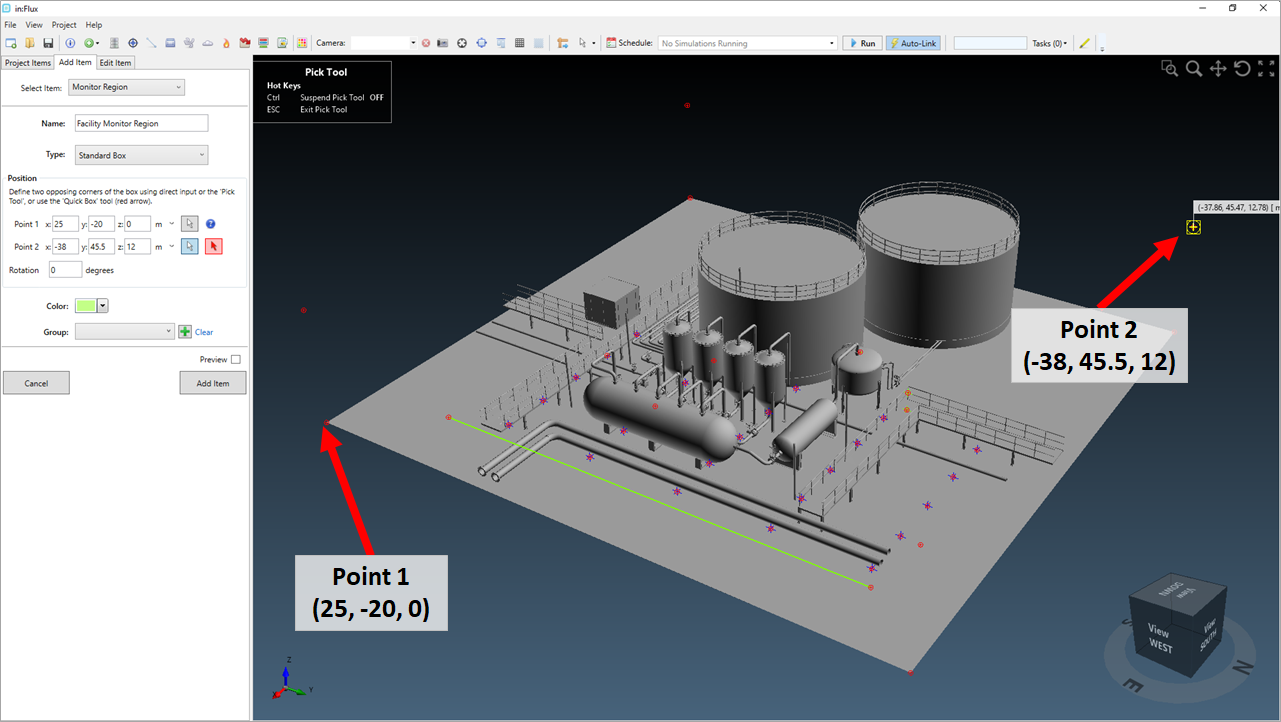
Tutorial 3 - Figure 23 - Indication of the two lower corners of the monitor region, a height value will be entered by changing one of the z-coordinates
-
Leave the Rotation as 0.
-
Leave the Color set to the default value.
-
Click the Preview checkbox to ensure that the transparent red cuboid encompasses the entire facility.
-
Click Add Item to add the monitor region to the project, the region should turn a transparent green color as in Figure 24 below.
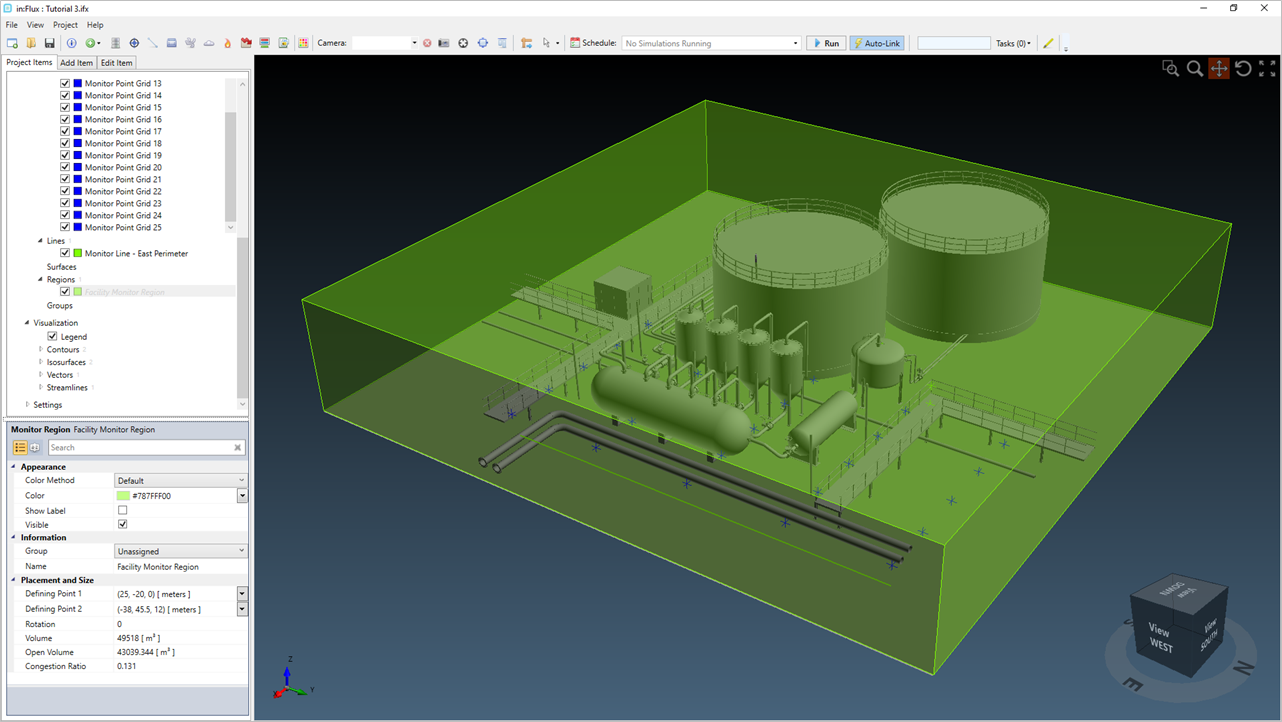
Tutorial 3 - Figure 24 - 'Facility Monitor Region' added to the in:Flux project
Monitor regions are independent of each other, meaning that you can define concentric and/or overlapping regions. Continue by adding a second monitor region around the flanges in the middle of the facility.
-
From the Add Items tab, choose Monitor Region from the dropdown menu and enter a Name of "Lower Flanges Monitor Region"
-
Leave the Type as Standard Box
-
Enter the following coordinate for Point 1 "(-2, -2, 0)"
-
Enter "(13.3, 24.7, 7)" and Point 2.
-
Leave the Rotation as 0.
-
Keep the default Color.
-
Click the Preview checkbox and ensure that the second monitor region is in a similar position to Figure 25.
-
Click Add Item to add the second monitor region to the project.

Tutorial 3 - Figure 25 - Indication of 'Lower Flanges Monitor Region' position
The third monitor region will be defined around the smaller horizontal vessel and leak location defined in Tutorial 2.
-
From the Add Items tab choose Monitor Region from the dropdown menu and enter a Name of "Equipment Monitor Region".
-
Enter the following coordinate for Point 1 "(11.5, 19, 0)"
-
Enter "(-12, 27, 8)" and Point 2.
-
Leave the Rotation as 0.
-
Keep the default Color.
-
Click the Preview checkbox and ensure that the third monitor region is in a similar position to Figure 26.
-
Click Add Item to add the third monitor region to the project.
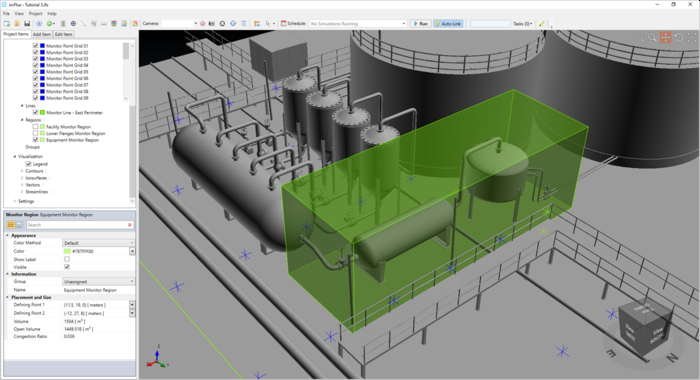
Tutorial 3 - Figure 26 - Indication of 'Equipment Monitor Region' position
Continue to the next section to review the information the monitor regions provide.