Simulation Scheduler
At the top of the in:Flux window exists the Simulation Scheduler, shown below, which is made up of three buttons:
-
Scheduler dropdown menu - opens the scheduler window which is populated with all the simulations of the project
-
Stop/Run button - the master control for stopping and starting simulations.
-
Auto-Link toggle button - sets whether simulations automatically start when the previous simulation completes. A blue square (
 ) indicates that this option is ON.

Tutorial 4 - Figure 05 - Simulation Scheduler buttons in the in:Flux toolbar. For this image, no simulations are running.
Since the Run Now option was selected during the definition of the ventilation simulations, the calculation will have already started. Click the dropdown menu of the scheduler as shown in Figure 06 to open the scheduler window.
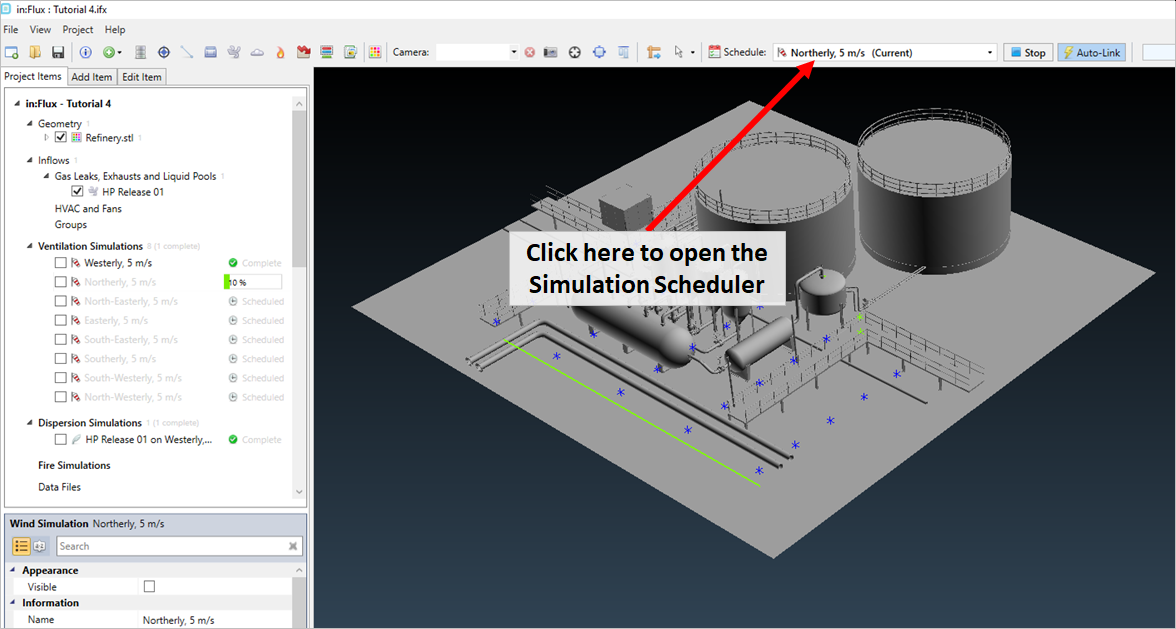
Tutorial 4 - Figure 06 - Indication of where to open the Simulation Scheduler window
The Simulation Scheduler window will appear upon clicking and is divided into three sections organizing the nine simulations of the project:
-
Scheduled Simulations - listing of simulations which have started calculating or are scheduled to start. The order (from to top bottom) represents the order in which in:Flux will calculate the simulations of the project.
-
Completed Simulations - simulations which have finished calculating
-
Unscheduled Simulations - simulations which do not fall into the above categories, e.g. simulations that have crashed or simulations which have been removed from the scheduler
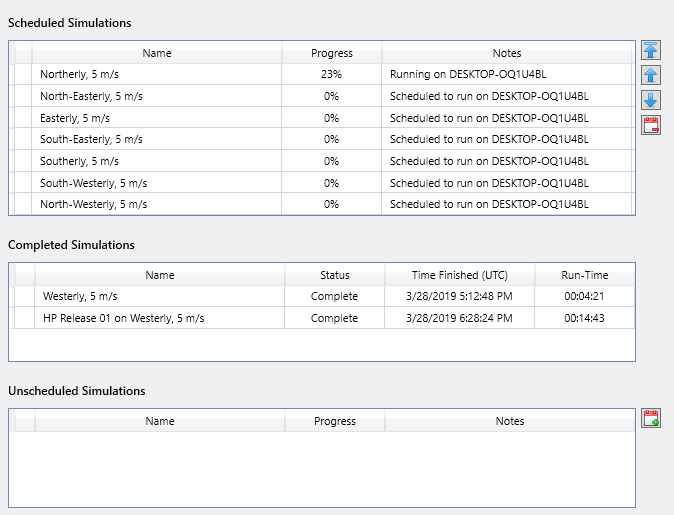
Tutorial 4 - Figure 07 - Simulation Scheduler window showing the 9 simulations of Tutorial 4.
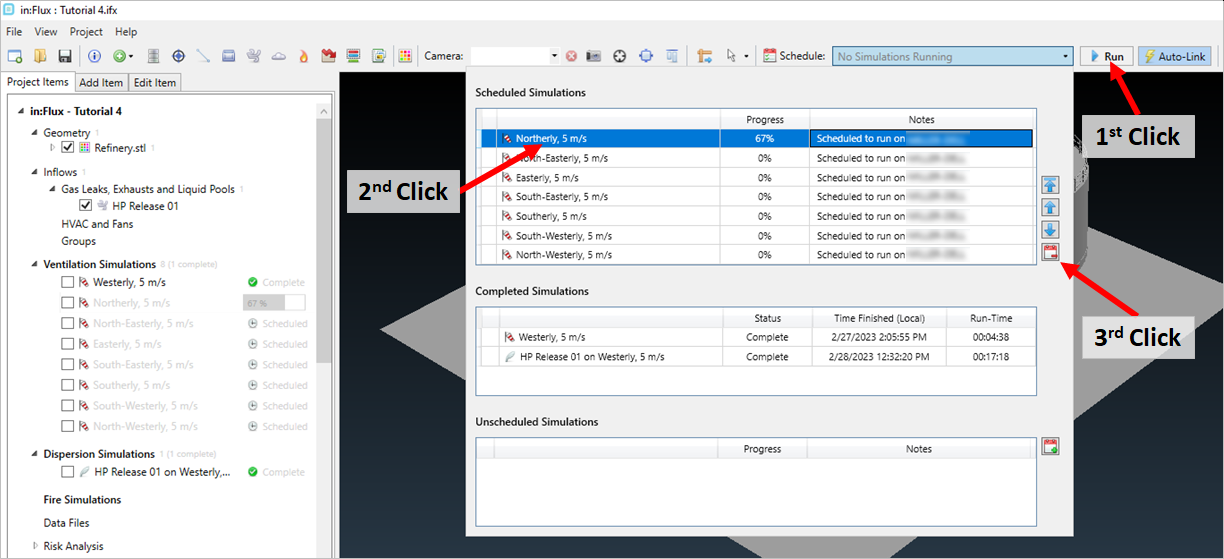
Five buttons exist on the right side of the window which can be used to edit the order of the scheduled simulations, these buttons will not have any effect on the top simulation in the scheduler as it is the simulation currently being calculated.
-
 - moves the selected simulation to the top of the list to be the next simulation calculated item in the Scheduled Simulations
 -
 - moves selected simulation up one position in the Scheduled Simulations section
 -
 - moves selected simulation down one position in the Scheduled Simulations section
 -
 - removes selected simulation from the scheduler, i.e. moves the simulation to the Unscheduled Simulations section
 -
 - adds selected simulation in the Unscheduled Simulations section to the Scheduled Simulations section
Press the Stop button on the toolbar (![]() ) to stop all the calculations. Select the top simulation that has been calculating, the Northerly, 5 m/s simulation for this example, and click the
) to stop all the calculations. Select the top simulation that has been calculating, the Northerly, 5 m/s simulation for this example, and click the ![]() button. This will remove the Northerly, 5m/s simulation from the scheduler and move it
to be listed in the Unscheduled Simulations section.
button. This will remove the Northerly, 5m/s simulation from the scheduler and move it
to be listed in the Unscheduled Simulations section.
Tutorial 4 - Figure 08 - Process of removing a simulation from the scheduler.
Proceed by promoting one of the simulations to be the next one to be calculated, for this example we'll promote the Southerly, 5 m/s simulation by selecting it in the scheduler and clicking the  button to move it to the top of the scheduler. Press the Run (
![]() ) button to start the calculation for the newly promoted ventilation
case.
) button to start the calculation for the newly promoted ventilation
case.
Your scheduler window will now appear as Figure 09 below. The calculation of the project will then progress in the order listed in the Scheduled Simulations section and leave the Northerly case as is until you resume it.
You may change the order of the simulations that aren't currently being calculated in the Scheduled Simulations section by using the ![]() and
and
![]() buttons. All simulations besides the top one (which is currently being calculated) can be moved within the scheduler while the calculation is progressing.
buttons. All simulations besides the top one (which is currently being calculated) can be moved within the scheduler while the calculation is progressing.
The Northerly, 5 m/s simulation will not be calculated as it has been moved to the Unscheduled Simulations section. You can add the Northerly simulation back to the scheduled list by clicking the  button. It will then be added to the bottom of the scheduled list. The reasoning for this step is to go over the process of moving simulations within the scheduler, the
southerly and northerly simulations were chosen arbitrarily.
button. It will then be added to the bottom of the scheduled list. The reasoning for this step is to go over the process of moving simulations within the scheduler, the
southerly and northerly simulations were chosen arbitrarily.
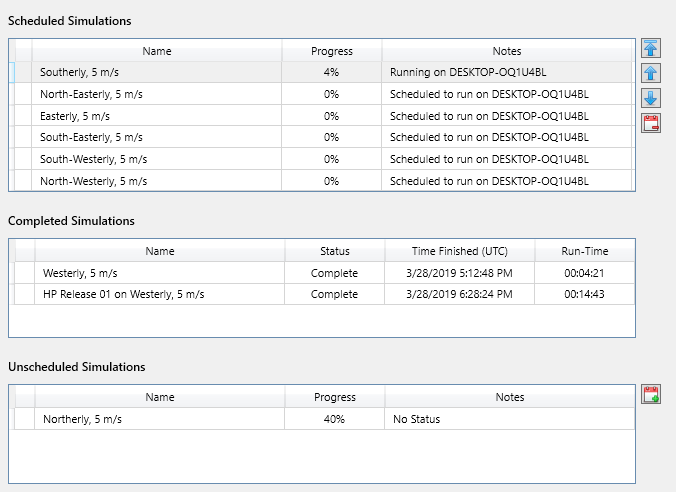
Tutorial 4 - Figure 09 - Promoted Northerly simulation and removed Southerly from the scheduler.
While the simulations are running, press Ctrl+S or go to the File menu and click Save, while the calculation is running.
in:Flux will automatically pause the calculation, save the project, and then start the calculation again. You will receive notification when the project has been saved successfully (Figure 11). There is no need to press Stop on the toolbar each time you want to save the project.
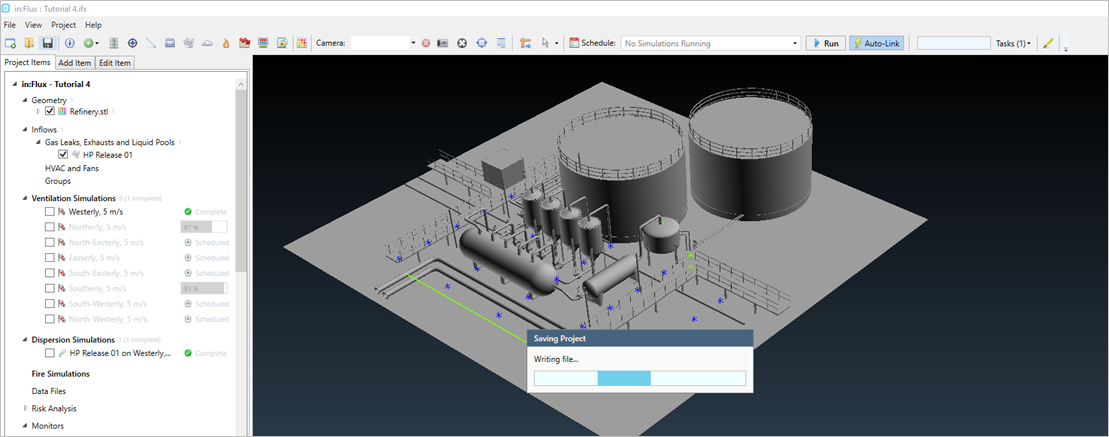
Tutorial 4 - Figure 10 - After Ctrl+S is clicked or File -> Save, in:Flux will stop the simulation automatically (seen by grayed out completion bar for the Southerly wind simulation) to save the project, preventing errors.
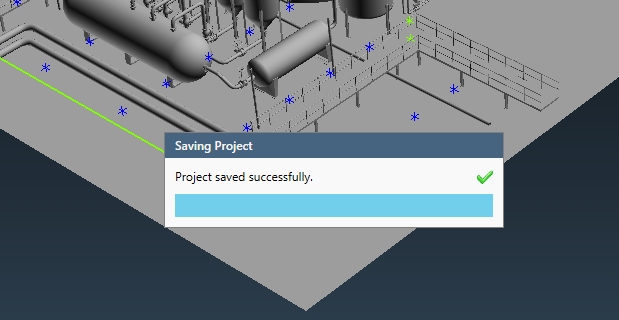
Tutorial 4 - Figure 11 - Confirmation window that project has been saved and automatically .
Let all the ventilation simulations complete before continuing to the next section.
If there are cases in the Unscheduled Simulations section, you can mouse over the simulation in the Project Items tab and click the Resume button that appears. This will automatically add the simulation to the bottom of the scheduler list and will start the calculation for the top simulation in the scheduler.
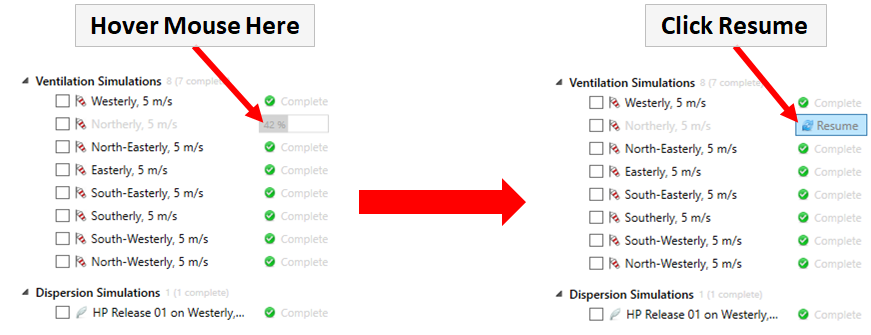
Tutorial 4 - Figure 12 - Steps for resuming a simulation that was removed from the scheduler.