Reviewing the Simulation Summary
The full scenario matrix generated from the information entered in the leak frequencies and wind conditions tab is shown on the Simulation Summary tab. It is here that all the simulations will be added to the project to run for analysis.
The total number of scenarios is listed on the right side of the window - 120 cases for this tutorial. The total frequency and total risk of the project will also be listed. At the moment, these values should be the same as no consequence value has been assigned. Note: frequency and consequence information may be added before or after simulations have complete.
As of version 3.12 there is a new Consequence option which can be selected by clicking the (![]() ) icon. This feature is also available by right-clicking on the risk data
set and selecting Consequence Weighting, or using the Project Menu. This capability gives a wide range of options for how consequence can be applied to each scenario listed in the Simulation Summary. This will be described in more
detail later in the tutorial.
) icon. This feature is also available by right-clicking on the risk data
set and selecting Consequence Weighting, or using the Project Menu. This capability gives a wide range of options for how consequence can be applied to each scenario listed in the Simulation Summary. This will be described in more
detail later in the tutorial.
At the upper right corner of the window is a dropdown for the Type of project to run:
-
Dispersion - will set all the scenarios in the Simulation Summary table to run as a gas dispersion simulation
-
Ventilation - will set only ventilation cases to run for risk analysis, HVAC can be included, described below
-
Fire - will set all the scenarios in the Simulation Summary to run as fire simulations
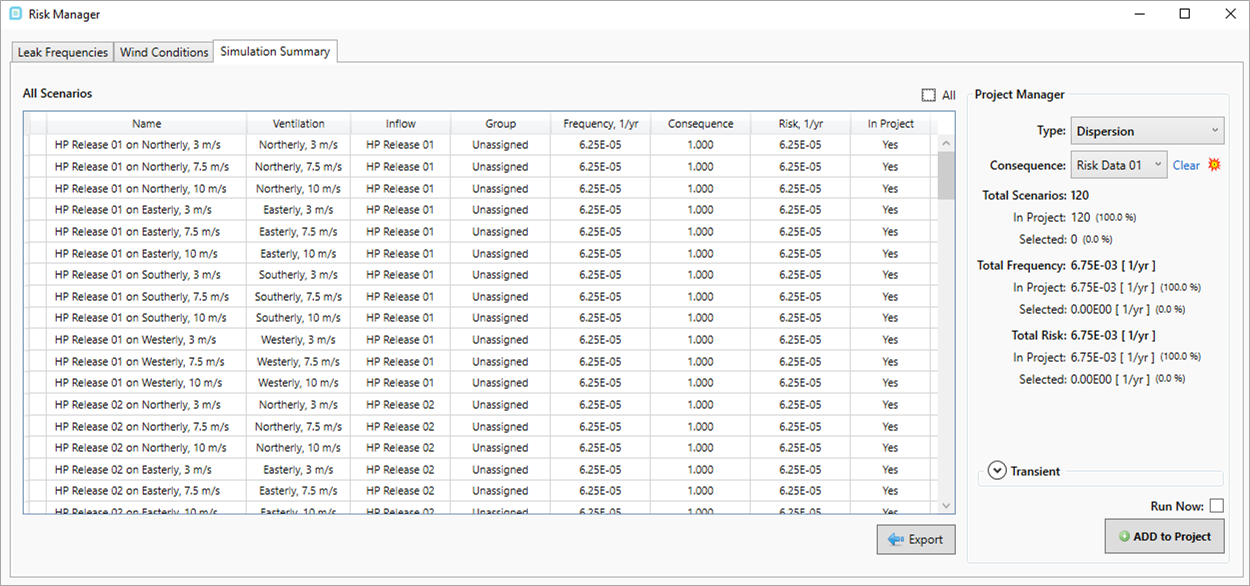
Tutorial 11 - Figure 19 - Simulation Summary tab for Tutorial 11
Clicking the top of the Frequency column will sort the cases by their associated frequencies. For some projects it may not be viable to run all the simulations listed in this table as some frequencies would be too low to affect the results as a whole, i.e. if a project has 1000 cases listed in the simulation summary which has a total frequency of 7E-03, it may be that only the top 800 simulations make up 6.9E-03 total frequency (saving the need to run 200 simulations). This can be investigated by selecting a group of simulations using the Shift key and comparing the Selected frequency value to the Total frequency.
If HVAC or Fans have been defined in the project (via the Add Items Tab) a dropdown menu will appear on the right side of the Simulation Summary tab to allow for HVAC to be selected and added to the simulations. If no HVAC has been defined this option will not appear.
For this tutorial, all defined cases will be added to the project, proceed by performing the following:
-
On the right side of the window, set the Type to Dispersion
-
Ensure the Run Now checkbox is unchecked and click Add to Project at the bottom right of the Risk Manager Window.
-
The ground level may need to be defined at this point. If prompted, click OK and set the ground height at 0m, to match the ground CAD item defined earlier and press Confirm
-
Click Yes in the window that appears to add 12 ventilation and 120 dispersion cases to the project.
132 cases will now be listed in the Project Items Tab. Save your project before continuing to define a risk data set and monitor region.