Other Solver File Features
"Cleaning" Solver Files
Cleaning solver files after they've been updated to the MASTER project is beneficial for saving and storing the data as for large projects gigabytes of replicated data can be removed to free up space on your machine.
Each solver file contains general data relating to the MASTER project file such as information regarding the geometry, leak locations, defined gas properties, etc. This data is needed to calculate the results however once simulations have complete this general project data is no longer needed as it is contained in the MASTER file. “Cleaning” the data files deletes this repeated data in each solver file.
It is important to first ensure that all the solver files have been synced and updated with the MASTER file before cleaning them. To clean solver files r
ight-click the Data Files option in the Project Items Tab and select Clean All.
Note that the opposite of cleaning solver files would be to Copy Project Data to All described above, however it is recommended to always make backups before performing this function.
Consolidate Solver Files
Some projects can have upwards of 50 or more solver files which may become difficult to transfer or manage. Additionally, the scope of a project may change so not all completed simulations are needed for the project. For situations such as these, the consolidate feature can be used. The features combines the completed simulation data into a smaller number of solver files, or the main .ifx project file itself.
To use this feature, right-click on Data Files in the Project Items Tab and select Consolidate, shown below. A small window, shown below, will appear. Here you can select to consolidate the solver files into a smaller number of files. A field is available to specify the number of files to make and the estimated number of simulations per each file. Click the Consolidate button to start the process.
![]()
Tutorial 13 - Figure 12 - Consolidate Icon from contex menu
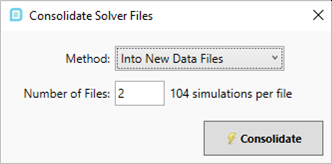
Tutorial 13 - Figure 13 - Consolidate Solver Files to new solver files
The consolidate feature will create new data files and automatically link them to the main in:Flux project. It will not delete the original existing data files. Once the consolidation process is complete you may choose to delete the original files.
Alternatively, you may set the method to Into Main Project File. This will bring all the completed simulation data into the main .ifx file. Note this will significantly increase the size of the .ifx file. Using this method, you will be prompted to delete the older .ifxs solver files upon consolidation.
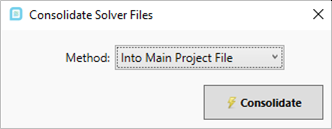
Tutorial 13 - Figure 14 - Consolidate Solver Files into Main .ifx project file
Touch Up Solver Files
A debugging feature in in:Flux which forces all solver files to an out of date state - thus forcing them to need to be updated. This may be useful if in:Flux believes it has updated all project data when in reality it has not. To use this feature, right-click Data Files in the Project Items Tab and select Touch All.
Using ifx:Solve to create more Distributed Solver Files
When creating additional solver files from the current schedule, the software now (optionally) leaves some simulations in the current schedule and moves other simulations to new files. The new files can then be loaded into other ifx:Solve instances and run. The new data files can be added to the in:Flux project by right-clicking “Data Files” and selected “Add Data Files” in the in:Flux project tree, as described below. This makes it significantly easier to split up projects if, for example, one data file is taking longer to complete than the others.
As an example the Tutorial 13 -00.ifxs file will be used, the following can be done while the simulation is calculating:
-
With ifx:Solve open with the file you want to split
-
Click the Create Distributed Solver Files button, shown below.
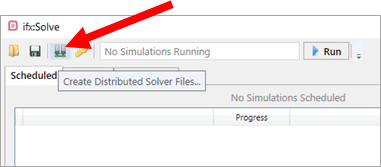
Tutorial 13 - Figure 15 - Creating new Solver Files from ifx:Solve
-
You will be prompted in how many files should be created. Enter a value and click Create Files. New files will now exist in the directory with a naming strategy:
-
Tutorial 13 -00 -00.ifxs
-
Tutorial 13 -00 -01.ifxs, etc...
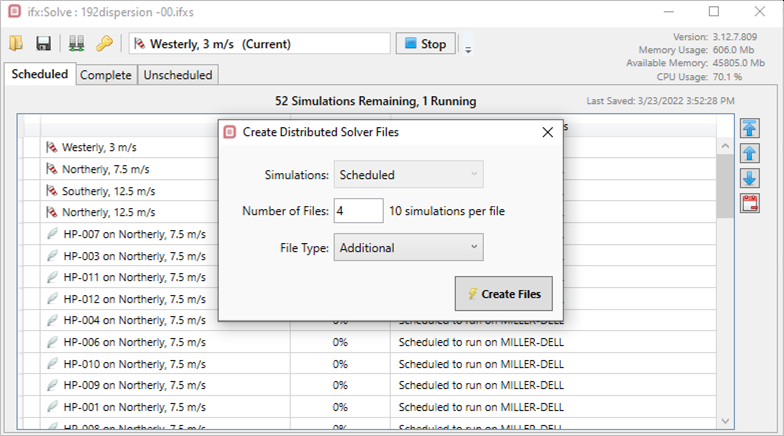
-
-
Now run these newly created solver files in new ifx:Solve instances as before.
-
When complete, the MASTER file will need to have these new files added. To do this, right click the Data Files text and select Add Data Files.
Reset Crashed Simulations within ifx:Solve
In the rare case that one of cases crash while being calculated in ifx:Solve you can reset it by going to the Completed tab and right-clicking in the window. A context menu will appear, select Reset All Crashed (shown below).
Note - the crashed cases may appear in the scheduled tab, complete tab or unscheduled tab, performing the steps mentioned will reset crashed cases regardless of their location within the tabs.
Click Yes on the next screen to confirm resetting crashed cases and after some processing those cases will be sent back to the Scheduled tab.
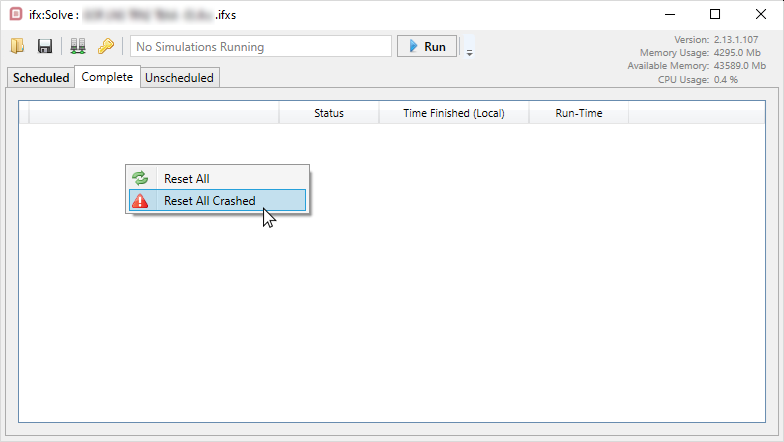
Tutorial 13 - Figure 17 - Resetting crashed simulations from ifx:Solve
This completes Tutorial 13, providing a description of the uses for Distributed Solver Files (*.ifxs) with in:Flux and ifx:Solve.