Adding an Inflow with ESD
A new inflow will be defined with an emergency shutdown (ESD) time applied. When this inflow is selected as an option for a fire case, it will automatically have the scheme set as transient.
-
From the Add Items tab, select Gas Leak or Emission as the Select Item
-
Ensure the Type is High Pressure Gas Leak and then enter a Name of "Pure Methane 100MW - ESD @10s"
-
From the Template dropdown options, choose Pure Methane 100MW to populate the other fields in the panel with the same properties (pressure, temperature, power, location, angle and elevation) as the 100MW case.
-
Near the bottom of the panel click the Isolation and Depressurization text to open the panel and enter a Shutdown (ESD) Time of "10 seconds"
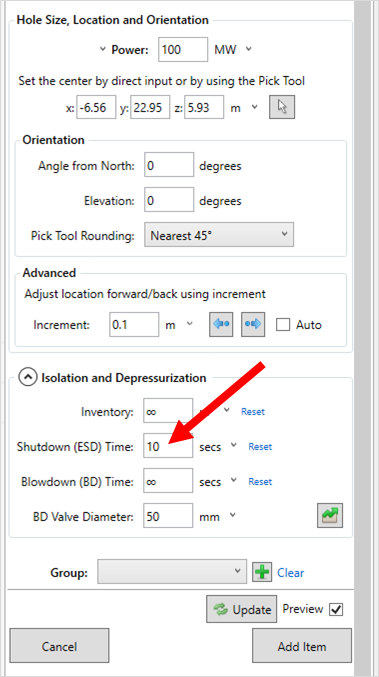
Tutorial 17 - Figure 03 - expanded isolation and depressurization panel for defining a shutdown time for the inflow
-
Click the green graph icon (
 ) to see a graph of the upstream pressure with time. At 10 seconds, the shutdown will occur and the upstream
pressure will reduce to 0 bar(g). Leave the other fields in the Isolation and Depressurization as is for this example. This graph can also be viewed from the Project Items Tab after the inflow is defined by right-clicking it
and selecting View Transient Profile.
) to see a graph of the upstream pressure with time. At 10 seconds, the shutdown will occur and the upstream
pressure will reduce to 0 bar(g). Leave the other fields in the Isolation and Depressurization as is for this example. This graph can also be viewed from the Project Items Tab after the inflow is defined by right-clicking it
and selecting View Transient Profile. -
Click the Add Item button to add the inflow to the project.
![]()
Tutorial 17 - Figure 04 - View of transient profile graph with an ESD at 10 seconds
Continue to the next section to define the transient fire case with a shutdown time.