Point Pick Tool
Since many objects are constantly added to projects, the ability to easily select particular points is necessary. The tutorials in this Help File will predominately use the Pick Tool to choose points for positioning objects in projects.
The Pick Tool in Detect3D and in:Flux can be used any time the arrow button  is shown next to a coordinate text box.
It allows you to select vertex points, edges, as well as faces in the geometry to extract coordinates from. Once a point has been selected, its coordinates are entered into the corresponding text boxes.
You can choose what type of points the Pick Tool "snaps" to. To change these options, select the arrow icon on the toolbar. The picture below shows the varying options which can be toggled on or off to change what the pick tool "snaps" to in the project. The options are defaulted so the pick tool will "snap" to vertices, edges, and surfaces.
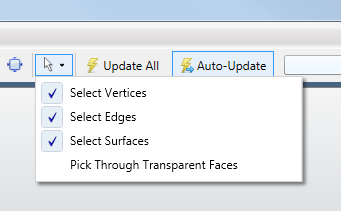
Pick Tool Options Panel
Once the arrow button has been selected to utilize the Pick Tool, a yellow crosshair icon appears to indicate the mouse position. The coordinates for which the crosshair is currently pointed to are shown just above it.
Hotkeys exist to aide in choosing points within the project. Below shows the Pick Tool Hot Keys Menu as well as the yellow crosshair icon and corresponding coordinate.
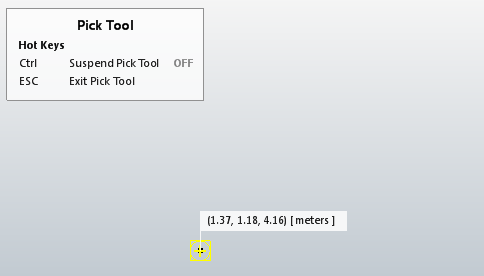
Pick Tool crosshair and coordinates shown with Hot Keys Menu
Pressing Ctrl while the Pick Tool is activated will suspend the pick tool thus allowing you to pan, rotate, or zoom. Hitting Ctrl again will reengage the Pick Tool and allow for you to select a point upon clicking the left mouse button.
Pressing Esc will exit the Pick Tool.
Varying Hot Key options exist for different project items they are very helpful while maneuvering in complex CAD files.