Setting up Multiple Ventilations
Load your saved Tutorial 3 file into in:Flux before continuing, or you can use the example file located in the inFlux Files for Tutorials 1 - 9.zip (81MB). If any post-processing or other project items are showing, turn off their visibility by deselecting the checkbox next to each item name from the Project Items Tab.
To setup multiple ventilation simulations:
-
Right-Click the Ventilation Simulations text in the Project Items tab and click Add Ventilation Simulation as in Figure 01 below.
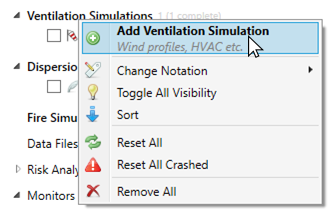
Tutorial 4 - Figure 01 - Right-Click Menu for adding ventilation cases
-
Set the Type to External and the Wind Speed to "5 m/s"
-
From the Wind Direction dropdown menu press and hold Ctrl on your keyboard and click each one of the wind directions, excluding the Westerly case as it was already simulated in Tutorial 1. A blue highlight of the text, as shown below, will appear upon each click.
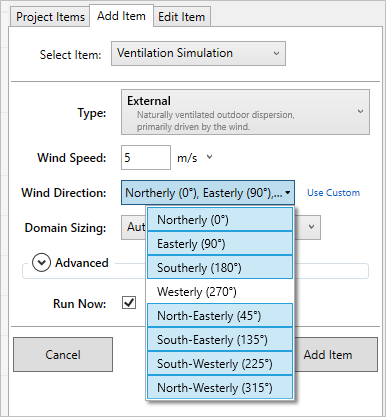
Tutorial 4 - Figure 02 - Selection of multiple wind directions by using Ctrl+click for each
-
Keep Automatic as the Domain Sizing and ignore the Advanced section for now.
-
Ensure that the Run Now checkbox is selected and click the Add Item button
That's it! You have now added 7 additional ventilation simulations to the project. A notification will appear stating that the wind profiles have been successfully added, as in Figure 02 below.
![]()
Tutorial 4 - Figure 03 - Notification of successfully added wind profiles
Return to the Project Items tab to see the list of ventilation cases now in the project. One of them will start initializing (meshing) and then will start calculating, the others will be have Scheduled listed next to their name as shown below. Continue on to learn about the simulation scheduler and how to change the order of the cases being solved.
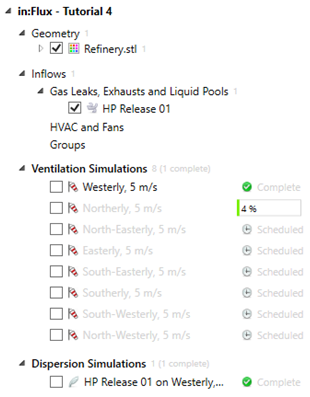
Tutorial 4 - Figure 04 - Listing of the 7 new ventilation simulations in the project items tab