Creating a Multi-Component Gas with DIPPR®
in:Flux comes included with access to the AIChE® DIPPR® database of chemicals. The DIPPR® database contains properties of various components, e.g. %LFL, %UFL, %Stoichiometric, Molecular Mass, Specific Heat, etc.
You can view the database by selecting the Fluids Database Icon (![]() ) from the toolbar. The Fluids Databases are comprised of three tabs representing three databases: 1) the DIPPR® database, 2) DIPPR® Liquids Database for pool fires, and 3) mixtures created in the project.
) from the toolbar. The Fluids Databases are comprised of three tabs representing three databases: 1) the DIPPR® database, 2) DIPPR® Liquids Database for pool fires, and 3) mixtures created in the project.
Using the DIPPR® database, or your own custom single-component gas, you may choose components to create a gas mixture. There is no limit to the number of components you can use to create your gas mixture.
For the purposes of this tutorial, we will create a hypothetical gas mixture as defined in Table 01 below. Feel free to use your own mixture but know the results will then be different than those shown in this tutorial.
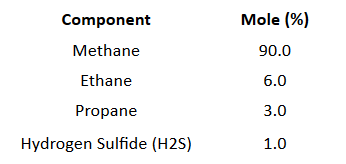
Tutorial 7 - Table 01 - List of four components and associated percentages for the Gas Mixture defined in Tutorial 7
To create a gas mixture:
-
Click the Add Item tab and select Gas Definition from the Select Item: dropdown menu.
-
Choose Multi-Component Gas Mixture as the Type
-
Enter the Name of the gas to be "Mixture from Tutorial 7"
-
The Mixture textbox will be empty at first but will automatically populate as components are added to the mixture. Next to the Add Gas: dropdown menu, select the database icon
 , as shown below.
Tutorial 7 - Figure 02 - location of Fluids Database when creating a gas mixture
-
In the Fluids Database window that appears, ensure the DIPPR® Database tab is selected and start typing "Methane" in the Search textbox at the upper right hand corner of the window. This will refine all the available components in the DIPPR® database to ones containing the term 'Methane.' Scroll to the bottom of the list and click on the Methane, CH4 component which has a CASN of 74-82-8 (listed in gray text on the bottom right of the Methane item.

Tutorial 7 - Figure 03 - Selection of 'Methane, CH4' component after entering its name in the search bar at the upper left
-
After clicking the Methane, CH4 item in the Fluids Database, notice that the Add Gas dropdown menu now has Methane chosen. Continue by entering "90" into the Concentration text box as in Figure 04 and click the Add button (
 ) to add the Methane component to the mixture. Your screen should appear similar to Figure 05 below. After clicking the button, the LFL, UFL, and stoichiometric percentages will be populated. At the moment, they are equivalent to values for pure Methane, but as components are added these values will be updated for the bulk mixture.
Tutorial 7 - Figure 04 - View after selection of the Methane component and entering a value of 90 as the %vol of the mixture

Tutorial 7 - Figure 05 - Add Item panel with Methane component added to the Mixture textbox listing
-
The Fluids Databases Window should still be open, if not click the database icon (
) to reopen it. Continue by adding the second component in Table 01 by: -
Entering "C2H6" into the Search textbox - names or chemical formulas can be used to search for components in the DIPPR® Database,
-
Click the Ethane cell to have it populate the Add Gas dropdown menu,
-
Enter a value of "6.0" into the Concentration textbox
-
Click the Add button (
) to add the Ethane component to the Mixture text box.
Tutorial 7 -Figure 06 - Process for adding the Ethane component to the gas mixture
-
-
You should now see both Methane and Ethane listed in the Mixture textbox listing as seen in Figure 07 below which also has updated values for LFL, UFL and stoichiometric percentages.

Tutorial 7 - Figure 07 - Add Item panel showing Methane and Ethane components added to the Mixture textbox listing
-
Close the Fluid Databases Window and click the Add Gas dropdown menu, this displays a condensed version of the DIPPR® database. Start typing "Prop" and the alphabetical list will bring your cursor to Propane, scroll down to the next listing so that Propane is highlighted and select it as shown in the figure below.

Tutorial 7 - Figure 08 - Selection of Propane as the next component to add for the gas mixture
-
Once Propane has been selected in the Add Gas dropdown menu, enter a value of "3.0" in the Concentration text box and click the Add button
to add the third component to the gas mixture. -
You may use either the method shown in Step 9 or the one described in Step 6 to add components to your gas mixture. Choose your preferred method to add the last component to the mixture - Hydrogen Sulfide, H2S. As this is the last component, leave the Concentration value as what is suggested by in:Flux, this will avoid any rounding errors. and will ensure all of the mixture's components add up to 100%. After adding all four components from Table 01, your screen should appear as the figure below.

Tutorial 7 - Figure 09 - View of Add Item panel with the 4 components listed before adding the gas mixture to the project
-
Ensure that your concentrations match that with Table 01 and the figure above. Click the Add Item button at the bottom of the panel to add the Gas Mixture for Tutorial 7 to the project.
The mixture will now be listed in the Project Database tab of the Fluids Databases window as shown below and can be exported for use on other projects. Mixture from Tutorial 7 will now be listed at the top of the Gas dropdown menu when adding a Gas Leak or Emission to a project.

Tutorial 7 - Figure 10 - Fluid databases window showing the Mixture from Tutorial 7 added to the project which can now be used when defining an inflow
Continue to the next section to setup a dispersion case with the created gas mixture.