Assign Consequence Values
As of version 3.12 the way to assign consequence has changed to the below method. If you have any questions, please email info@insightnumerics.com
To obtain the risk for each dispersion case as well as the total risk for the project, a consequence value needs to be entered.
For the purposes of this tutorial, the consequence entered will be based on the cube root of the mass of the flammable gas cloud for each case. This value can be obtained from the monitor region defined earlier in the tutorial. Many other options are available for the consequence assignment, and the function can be modified depending on the requirements of the project. At the end of this page is a list of the various options.
It is important to add a consequence in addition to the frequency as some leaks could produce very small gas clouds (small consequence) but have a high frequency and thus might not be as applicable to the analysis as a much larger gas cloud (large
consequence) with slightly less frequency. This is why consequence is needed for risk-based analyses as risk is calculated by multiplying the frequency by the consequence. These risk results can then be used for gas detector optimization or other analyses.
Before continuing, check that Monitor Region 01 has been updated with the dispersion data by opening the Volume Analysis Window, shown below, and ensure that the dispersion cases each have a calculated cloud volume and mass. If no data is present click the Update button or send the data to be updated using ifx:Solve.
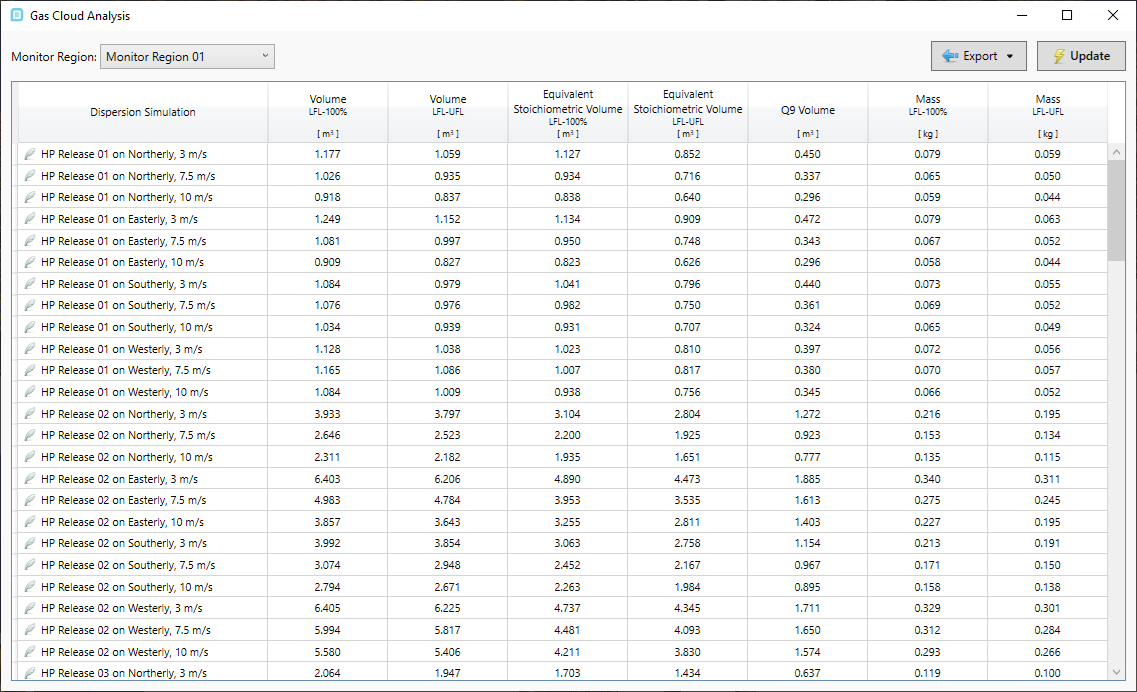
Tutorial 11 - Figure 29 - Volume Analysis window showing results for the 120 dispersion cases
Next, open both the Risk Manager (by clicking the ![]() icon on the toolbar) and also open the Consequence Weighting window by
right clicking Risk Data 01 in the Project Items Tab, and selecting its name from the available options. The Consequence Weighting can also be opened from the Project Menu or at the upper right of the Simulation Summary Tab of the Risk Manager by clicking the blast icon (
icon on the toolbar) and also open the Consequence Weighting window by
right clicking Risk Data 01 in the Project Items Tab, and selecting its name from the available options. The Consequence Weighting can also be opened from the Project Menu or at the upper right of the Simulation Summary Tab of the Risk Manager by clicking the blast icon (![]() ). Your screen should appear similar to the figure below
). Your screen should appear similar to the figure below

Tutorial 11 - Figure 30 - Opening the Consequence Weight and Simulation Summary at the same time, prior to assigning consequence values which is indicated by the 1.000 values
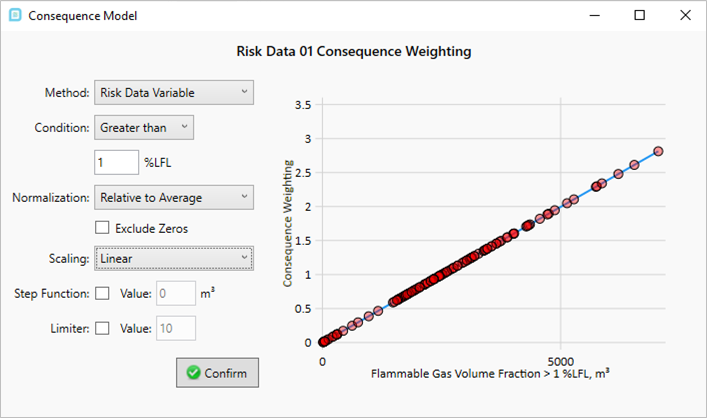
At this moment, the values in the Consequence Weighting Window have not been applied yet as all the consequence values in the Simulation Summary are set to 1.000 (indicated above by the red arrow). Follow the steps below to assign values from the Consequence Weighting Window to the Simulation Summary:
-
Set the Method to Monitor Region Volume
-
Set the Region to Monitor Region 01
-
Choose the Volume (LFL-100%) as the Volume
-
Select the Relative to Average as the Normalization
-
and finally the Scaling to Cube Root
-
Ensure your settings are similar to the figure below and click the Confirm button
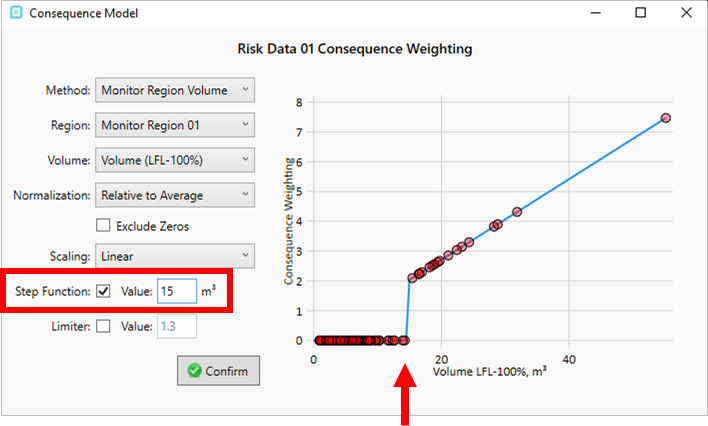
The blue line on the graph shows the consequence function, while the red dots show the simulations in the risk data set.

Tutorial 11 - Figure 31 - Consequence Weighting Window before confirming the consequence scheme set out in the steps above
Upon clicking the Confirm button in the Consequence Weighting Window, the consequence values listed in the Simulation Summary of the Risk Manager will changed. With the consequence value assigned, the risk values for each case is also updated. The summation of all the risk values will be displayed on the right under the Total Risk heading, indicated below. Each of the columns in the table below can be sorted by frequency, consequence or risk.
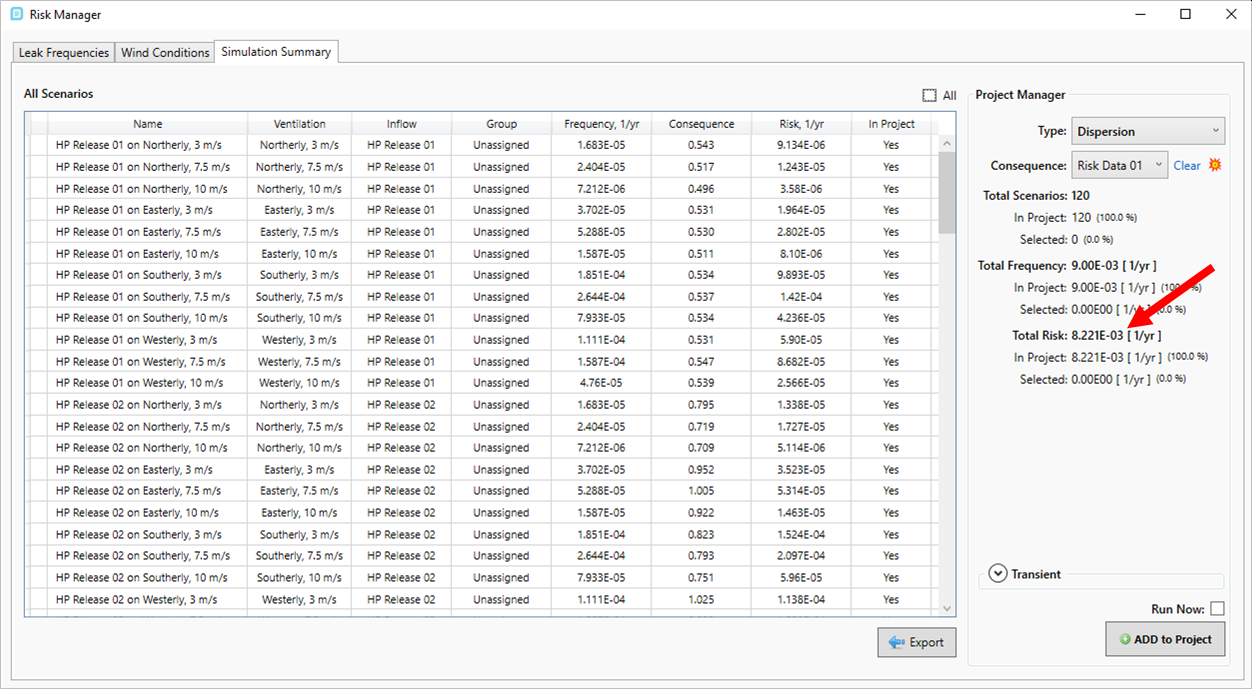
Tutorial 11 - Figure 32 - Updated Risk Manager showing the applied consequence values as well as the calculated risk for the simulations run
The frequency, consequence and risk values for each case can be added or edited before or after simulations have calculated. Updating for this information only takes a few seconds which allows you to quickly compare different methods (described further below) for assigning consequence. Changing the frequency or consequence values will not affect the dispersion results but will affect the risk contours.
Close the Risk Manager and continue to the next section to add a contour of risk incorporating the consequence values just entered.
Notes about the Consequence Weighting Window
-
As the consequence function is now associated with the risk data set, one simulation can have different consequence values for different risk data sets. This increases the flexibility of projects that may require multiple risk-based analyses. For example, it is now possible to run combustible and toxic gas risk analyses in the same project. In previous builds, the consequence was assigned to the simulation and only had one value for all risk data sets.
-
The variable of the risk data set can now be used as a basis for the consequence function. It is not necessary (although it is recommended) to add a monitor region to calculate volumes. Note that volumes calculated by the risk data set may be slightly different than those calculated by monitor regions, as the resolution of the risk data set is generally lower than the simulation’s mesh, which is used by the monitor region.
-
The consequence function can be assigned when creating a new risk data set. The consequence is automatically calculated, so there is no need to set the consequence separately after all the simulations are complete.
Below is a description of the various dropdown options for how to change the consequence function to be used for the project.
Method
-
Risk Data Variable - as a variable is chosen when you define a risk data set, you may use this variable to assign a consequence value. The variable will be listed on the x-axis of the graph. The value is taken from the calculated results for each simulation in the project.
-
Condition - based on the variable of the risk data set chosen, user can select Greater than, Less than, or Between an entered value.
-
-
Monitor Region Volume (Default) - uses data from the monitor region for assigning a consequence value.
-
Region - allows user to select the monitor region to be used for calculating the consequence, as several monitor regions may be in the same project
-
Volume - choosing the method for which the cloud volume is calculated. These options are equivalent to the columns displayed in the Volume Analysis Window.
-
-
Uniform - sets all consequence values to 1
Normalization
-
Relative to Value - allows user to enter value to normalize consequence data around. This will be based on the volume or variable chosen, e.g. 1m3 for the Volume LFL-100%.
-
Relative to Average (Default) - Normalizes the consequence values relative to the average of all the consequence values.
-
Relative to Median - Normalizes the consequence values relative to the median of all the consequence values.
Scaling
-
Cube Root (Default) - sets the scaling of the consequence function to a cube root. The blue line represents the consequence function itself, while the red dots show the simulations in the risk data set. This is the most common use for combustible gas clouds.

-
Uniform - sets all consequence values to 1, same as the uniform method. Using the uniform method here still allows for the step function and limiter options to be used.

-
Linear - sets the scaling of the consequence function to a linear equation
-
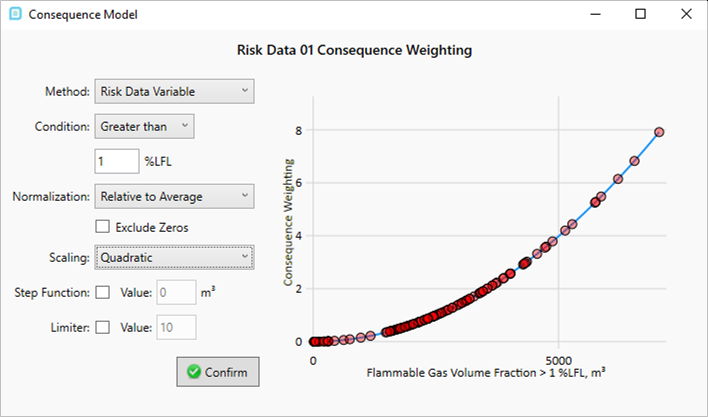
Quadratic - sets the scaling of the consequence function to a quadratic equation
Other
-
Exclude Zeros - excludes simulations which have zero data for the variable of the risk data set. This is useful if running simulations which may have H2S, not all cases could have the toxic gas, these cases may need to be excluded from the analysis. Using the Exclude Zeros capability helps with this. Those simulations excluded in this way will affect the 'relative to average' and 'relative to mean' normalizations.
-
Step Function - used so that values below the entered volume can be removed from contributing to consequence
-
Limiter - opposite to the step function, where a consequence value is limited to an entered value, any case having consequence higher than the entered value is set to that entered value.
