Defining a Wind Rose with the Risk Manager
The second tab of the Risk Manager Window sets the environmental conditions on the site. Wind speed and directional data will be entered here.
For simplicity, this section will define four wind directions each with three wind speeds. The difficulty with risk-based projects is determining the balance of the time needed to calculate all defined simulations with the desire to simulate the most relevant scenarios. Each additional wind case is an additional multiplier to the total number of simulations to be calculated and should be considered carefully. Refer to the Risk-Based Gas Mapping Workflow document for further guidance on this topic.
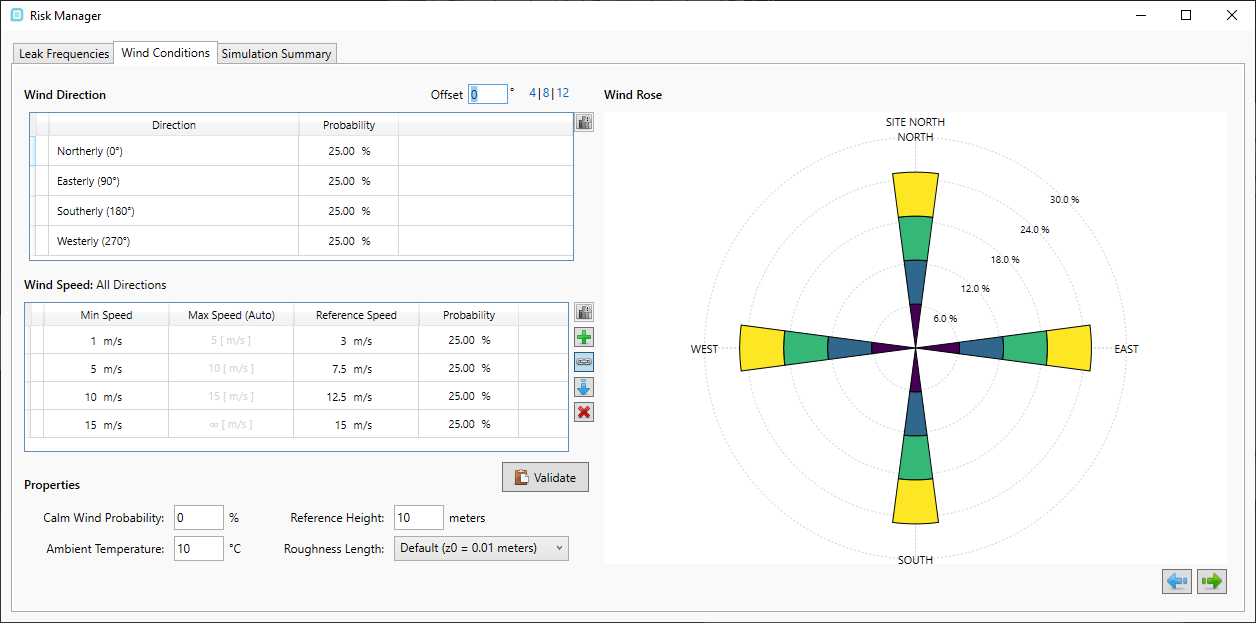
Tutorial 11 - Figure 16 - Wind Conditions tab of Risk Manager in initial state
To define the wind conditions in the risk manager:
-
Select the Wind Conditions tab from the Risk manager and enter the following probabilities for each of the four wind directions by clicking within the corresponding cell and changing the value so it appears as below
-
Northerly - 5%
-
Easterly - 11%
-
Southerly - 55%
-
Westerly - 33%
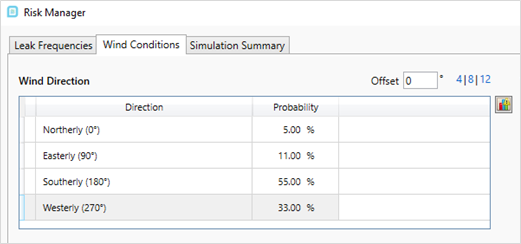
Tutorial 11 - Figure 17 - Entered probability values for the wind directions
-
-
You may have noticed, the above values for the probabilities adds up to more than 100%. To resolve this issue, click the normalize button (
 ) at the upper-right of the Wind Direction table. This will normalize each of the values, so they add up to 100%.
 -
In the Wind Speed table, select the 15m/s row and click the delete icon (
 ) to set the analysis to only have three
ranges for wind speeds.
) to set the analysis to only have three
ranges for wind speeds. -
Leave the wind speeds as 1m/s, 5m/s, and 10m/s for the minimum values. You may choose to enter different values but for the purposes of this tutorial the defaults will be used.
-
Now set the probability values to 35%, 50%, 15% for the 1m/s, 5m/s and 10m/s speeds, respectively. The Risk Manager should appear similar to Figure 18 below.
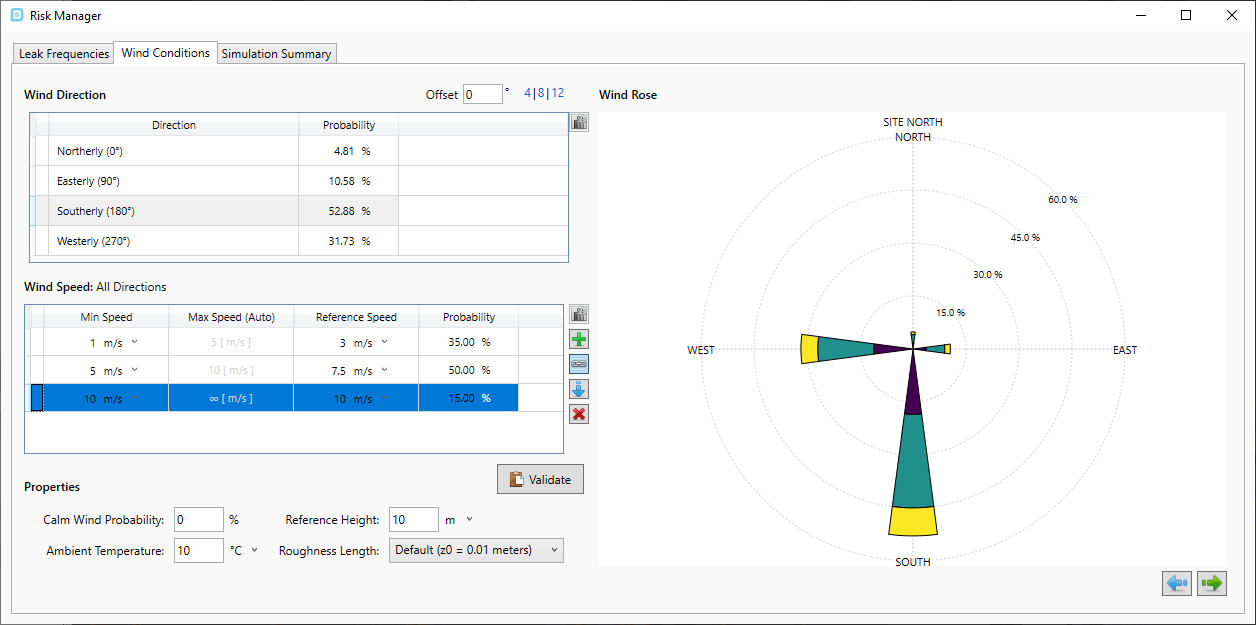
Tutorial 11 - Figure 18 - Completed wind rose data for Tutorial 11
-
Click the Validate button
 to ensure that each of the probabilities sum to 100%. If they do not, click the normalize button
  next to the wind direction and wind speed tables. Other properties such as ambient temperature, roughness length and reference height may be entered
but for this tutorial are left to their defaults.
next to the wind direction and wind speed tables. Other properties such as ambient temperature, roughness length and reference height may be entered
but for this tutorial are left to their defaults.
An offset angle can be applied to the wind rose so that wind directions are angled to match the meteorological conditions. It is important to verify that wind directions entered are based on the meteorological cardinal directions and not the platform directions as this will affect the frequency and risk results.
Continue to the next section to look at the combined list of scenarios of the 10 leaks and 12 wind cases.