Setting up the ifx:Solve Service
The ifx:Solve Service is a background service that turns a Windows or Linux workstation into a network solver for in:Flux. Once installed, in:Flux can send simulations to that machine from its Network Manager (found under the Project menu), monitor their progress, and collect the results — the service machine needs no one logged in and shows no window while solving. Spare workstations, analysis machines and virtual machines can therefore be pooled into a single solver network.
No solver files are needed. in:Flux sends simulations to the service machines straight from your project, so there is nothing to split up, copy between machines, or load back in afterwards. The Distributed Solver File sections of this tutorial describe the other route, where files are created and opened in ifx:Solve by hand.
The service is fully self-contained: the installer includes the solver and everything it needs to run, so nothing else needs to be installed on the solver machine — no separate ifx:Solve or in:Flux installation is required.
Setting up network solving takes two steps: install the ifx:Solve Service on each machine that will compute simulations, then connect to those machines from in:Flux's Network Manager. In most networks the second step is automatic — in:Flux finds service machines on its own.
Installing on Windows
Run the ifx:Solve Service installer (ifxSolveService_setup64.exe) on the solver machine. Administrator rights are required, as the installer registers a Windows service that runs machine-wide.
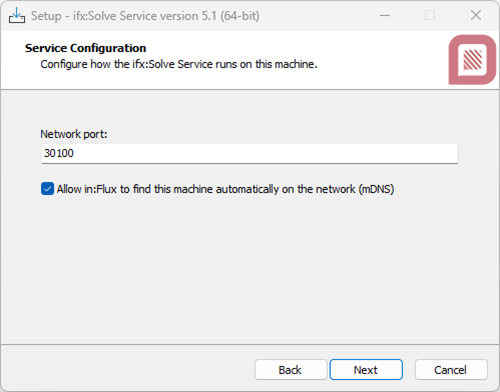
Figure 1 - The Service Configuration page of the Windows installer
The installer's Service Configuration page has two settings:
-
Network port — the port in:Flux uses to reach this machine. The default of 30100 is correct for almost all installations; only change it if that port is already in use on the machine. If you do change it, note the new value — you will need it when adding the machine in in:Flux.
-
Allow in:Flux to find this machine automatically on the network (mDNS) — enabled by default. With this checked, the service announces itself on the local network so that in:Flux workstations on the same subnet list it automatically, with no address to type in. Only untick this if your IT policy does not permit network service discovery; the machine can still be added to in:Flux manually by its address.
The installer then registers the service (set to start automatically with Windows), opens the Windows Firewall for the chosen port and for discovery (on private and domain networks), and starts it immediately. A small companion icon appears in the notification area showing the service's status, and a local administration page is available on that machine at http://localhost:30100/admin (substitute your port if you changed it).
To upgrade, simply run a newer installer over the existing installation — the port and discovery settings you chose are kept, and any simulations recorded on the machine are preserved.
Installing on Linux
The Linux build runs as a systemd service on any standard 64-bit distribution (RHEL/Rocky/Alma, Ubuntu, Debian, SUSE, etc.). It is distributed as a tarball in two variants: x64 for Intel/AMD processors and arm64 for ARM. Copy the tarball matching your machine to the host, then unpack and install it:
tar xzf ifxsolve-service-linux-x64-<version>.tar.gz
cd ifxsolve-service
sudo ./install.sh
The installer copies the program to /opt/ifxsolve-service, installs and starts the systemd service, and opens the firewall ports (TCP 30100 for solving plus UDP 5353 for discovery) if the machine runs firewalld or ufw. If the firewall is managed elsewhere, open those two ports by hand.
The service is then managed with the usual systemd commands:
systemctl status ifxsolve-service      # health
journalctl -u ifxsolve-service -f      # live logs
sudo systemctl restart ifxsolve-service
To change the port or turn automatic discovery on or off, edit /var/lib/ifxsolve-service/config.json (the settings are named Port and EnableMdnsAdvertising) and restart the service. This file survives upgrades. If you change the port, also open the new port in the firewall.
When a newer build is published, the service's administration page shows a notice. To update in place, run sudo ifxsolve-service-update on the host — it fetches the latest build, replaces the program files, and restarts the service while preserving its data and settings. To uninstall, run sudo ./uninstall.sh from the unpacked bundle.
Connecting from in:Flux - automatic discovery
With the master project open in in:Flux, open the Project menu and click Network Manager, then click Run Manager. The Available Workstations list shows every service machine in:Flux has found.
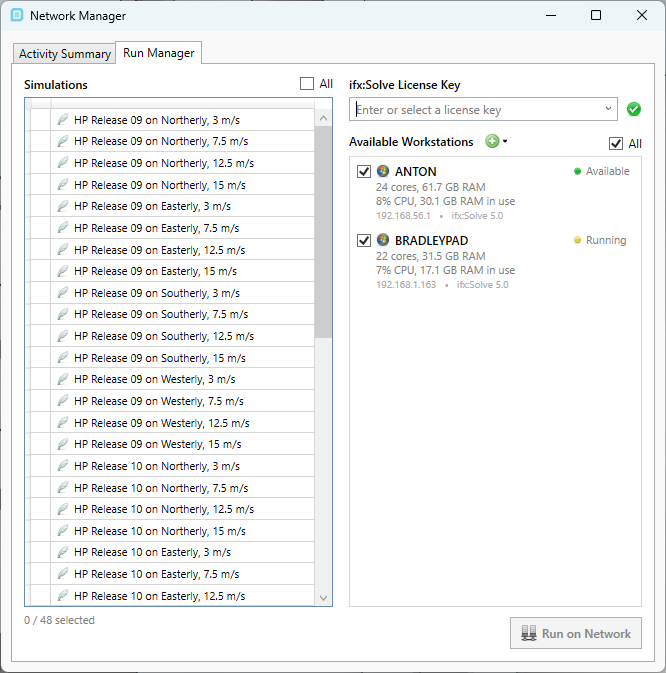
Figure 2 - The Run Manager with automatically discovered workstations
Machines running the ifx:Solve Service announce themselves on the local network (via mDNS, the same mechanism used by network printers), so in most offices the list fills in by itself within a few seconds — there is nothing to configure. Each entry shows the machine's name and operating system, its hardware (cores and memory), its current load, and the solver version it is running.
Automatic discovery requires that the in:Flux workstation and the service machine are on the same subnet — discovery announcements do not cross routers or VLAN boundaries — and that discovery was left enabled when the service was installed. If a machine you expect does not appear, add it manually as described below.
Adding a workstation manually
If a service machine is on a different subnet (for example, a virtual machine in another network segment), or discovery is blocked or was disabled at install time, add it by address instead. Click the Add button next to the Available Workstations heading and enter the machine's host name or IP address, with the port after a colon if it was changed from the default — for example 192.168.1.20 or solver-vm.company.local:30200. Without a port, the default of 30100 is used.
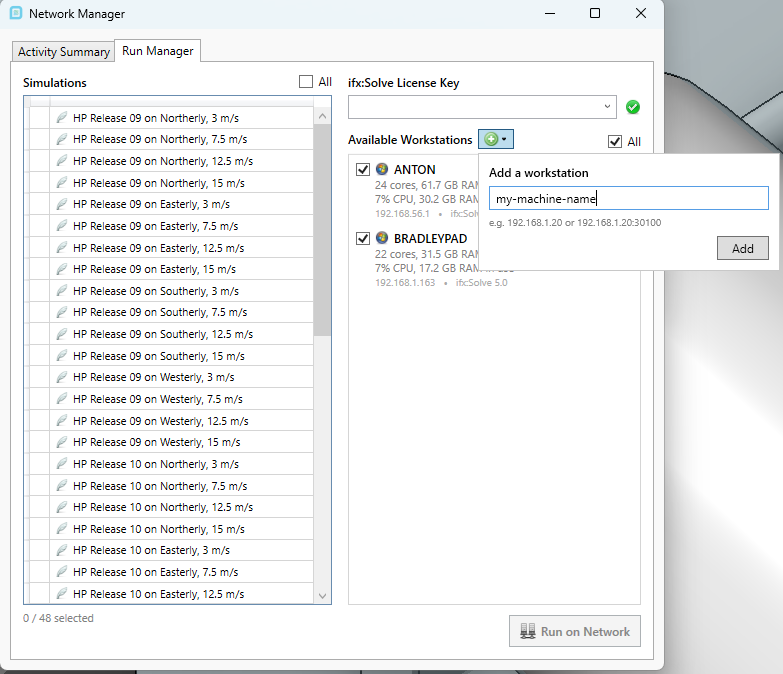
Figure 3 - Adding a workstation by address
The machine appears in the list immediately — shown as Offline until in:Flux reaches it, at which point its name, hardware, and load details fill in. Manually added machines are remembered, so they reappear the next time the Network Manager is opened, and can be removed with the button on their row. Automatically discovered machines need no such housekeeping; they appear and disappear on their own.
If a machine cannot be reached
A machine that stays Offline after being added, or that never appears in the list, is nearly always a network or service issue on the solver machine. Check, in order:
-
The service is running — on Windows, look for the ifx:Solve Service icon in the notification area or check Services; on Linux, run
systemctl status ifxsolve-service. -
The firewall allows the port — TCP 30100 (or your chosen port) inbound on the service machine. The installers open this automatically, but a third-party firewall or network appliance between the machines can still block it. Note that on Windows the rule covers private and domain networks only — a machine whose network is classified as Public will not accept connections.
-
The address and port match — if the port was changed from 30100 at install time, it must be given explicitly when adding the machine manually.
-
For automatic discovery only — both machines are on the same subnet and UDP port 5353 is not blocked. If they are on different subnets, use manual add; solving itself works fine across subnets.
Running Simulations
Once the machines you want appear in the list, tick them, select the simulations to run, and enter your ifx:Solve license key. Note that an in:Flux license will not work with ifx:Solve — a separate license is needed. Clicking Run on Network then distributes the selected simulations across the ticked workstations, and their progress can be followed from the Network Manager's activity view.
Each workstation you tick uses one ifx:Solve seat while it is solving, so the number of machines that can run at once is set by the number of seats you hold. Seats are not tied to particular machines — a seat is taken while a machine solves and released when it finishes — so the service can be installed on more machines than you have seats for, and you simply select which of them to use for a given run.