Defining a new Risk Grade
Be sure to download and open the Tutorial 2.d3d file from the Detect3D Tutorials.zip (22MB) before starting this section. Toggle contours off when you open the file.
For the purposes of this tutorial a new risk grade will be added to the project. However, you can also change the gas cloud size by editing an existing risk grade, this is done in Tutorial 2.
This section will add some risk grades to the project each with a different gas cloud size. Having a different gas cloud size set to each risk grade is allowed but only one can be appear in the 3D window one at a time.
To add a risk grade to the project:
-
In the Add Items tab, select Risk Grade from the Select Item dropdown menu
-
Change the Name to “5m Gas Cloud"
-
Enter the Description as "Risk Grade for 5 meter Gas Clouds"
-
Choose a Base Color for the risk grade. This tutorial will use Blue
 , but you may choose any color
 -
Ensure Combustible is selected as the Gas Type
-
Enter a value of "5 meters" as the Gas Cloud Size
-
Set the Gas Concentration as "100%". Due to the analysis method, this value will change the field-of-influence (FOI) for the open-path gas detectors but not the point gas detectors.
-
Leave the other values as their defaults
-
Click the Add Item Button.
The new risk grade will then appear in the Project Items Tree under the Risk Grades header, as shown in Figure 1.
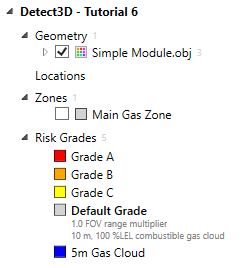
Tutorial 5 - Figure 01 - Project Items Tab with new risk grade added
Repeat Steps 1 - 9 above to add another risk grade for a 7 meter gas cloud and again for a 10 meter gas cloud, choosing a color for each.
With the three new risk grades added, delete Grade A, Grade B and Grade C by right-clicking on each and selecting Remove. If prompted, click okay to verify the deletion. Leave the Default Grade. The Project Items tab should now appear as Figure 2 below.
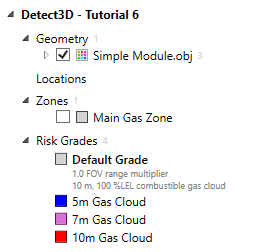
Tutorial 5 - Figure 02 - Project Items Tab with new risk grade added
The risk grade with the FOV/FOI Viewing Default in the Project Items tab appears with some gray text below its name describing the various properties of the risk grade. In Figure 2 above we see that a 10m gas cloud size was used at the end of Tutorial 2. Users may use either method for changing gas cloud sizes: editing the existin risk grade (which was done in Tutorial 2) or making a new risk grade and assigning it to a zone, which will be done in this tutorial.
The next section will go over how to change the Visible risk grade.