Sub-Zone Optimization
In this section, we will re-run the optimization with new settings on a sub-zone region.
-
Delete the three detectors added in the previous section, by right-clicking each and selecting Remove
-
Create a sub-zone at a radius of 2 meters around one of the tanks as shown in Figure 19, using the Equipment Pick Tool. If you are unfamiliar with adding sub-zones around equipment, please review Tutorial 4.
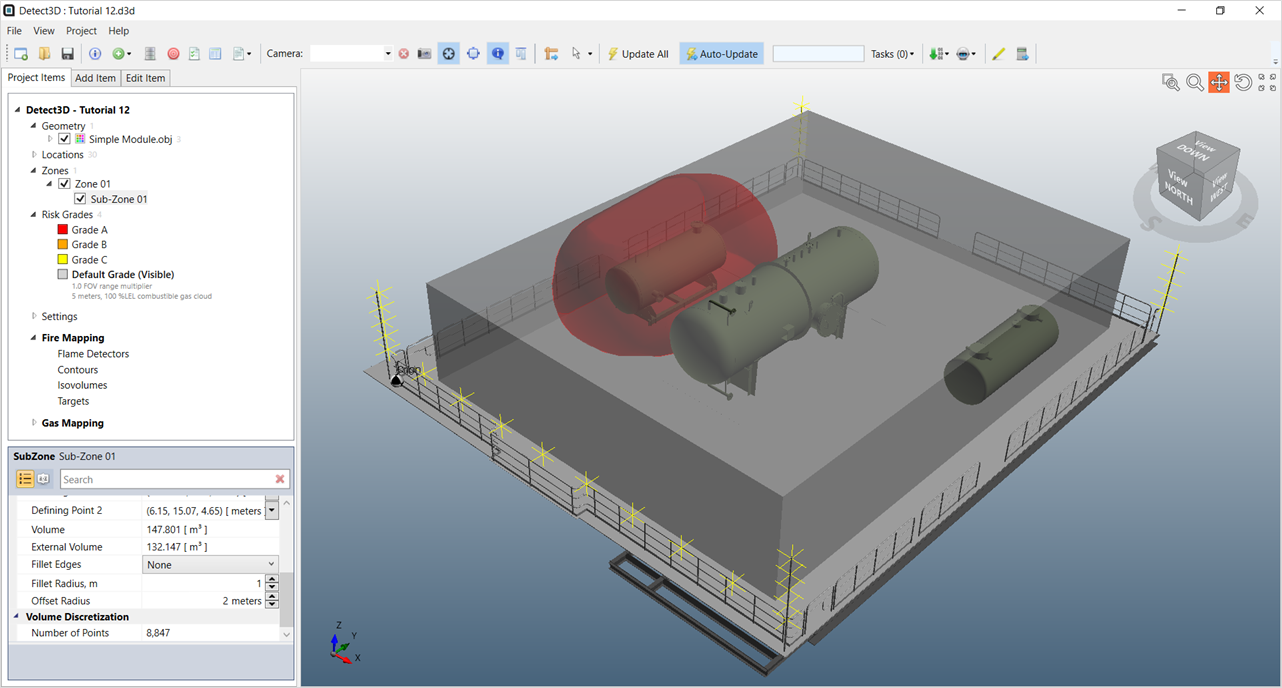
Tutorial 12 - Figure 19 - Update project with sub-zone added with the equipment pick tool around a small tank.
-
Once the sub-zone is added, open the Optimization Controller.
-
You will see the data from the previous simulation loaded. We are going to re-run the optimization to include the sub-zone so the previous needs to be cleared. To do this, press the “reset” button. When the warning message appears, click “Yes”.
-
Open the Coverage Target dropdown menu and set a target of 0% 1ooN and 85% 2ooN for the Sub-Zone 01 (see image below). Setting a target to 0% tells the algorithm that no target is set for 1ooN for the sub-zone, and it should focus solely on the 2ooN target.
-
Make sure the target coverage for Zone 01 is still set of "90% 1ooN" and "50% 2ooN." Doing this will set the algorithm to optimize both targets.
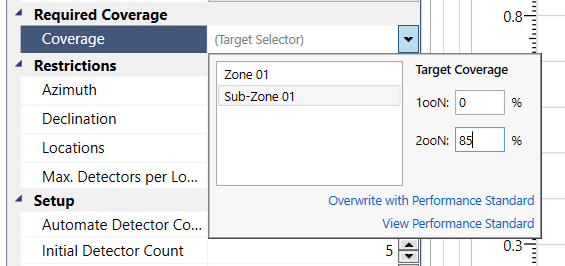
Tutorial 12 - Figure 20 - Updating the target coverages for the optimization simulation
-
Set the Initial Detector Count to 2 under the Setup heading of the Problem Definition as shown below. This will set all the initial layout of the genetic algorithm to use only 2 detectors, which will be fewer than required number of devices needed. We expect the algorithm to add detectors in this example.
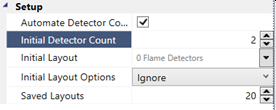
Tutorial 12 - Figure 21 - Reducing the initial detector count from 5 to 2 detectors in the first generation of the optimization simulation.
-
Press Run and monitor the coverage, fitness and detector count graphs. Make sure that the Preview checkbox is selected so that you can see the development of the best layout.
-
Stop the simulation when the maximum fitness flat-lines for more than 30 generations . An example of a good time to stop the simulation is shown below. See When to Stop the Simulation for more information.
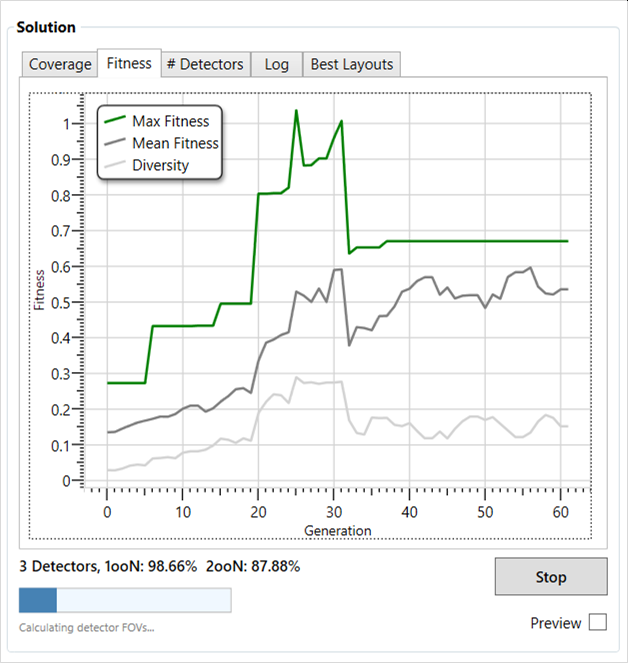
Tutorial 12 - Figure 22 - Chart showing fitness of the second optimization run starting to flat-line after generation 35
-
Click on the # Detectors tab to see that for this example, the detector count increased up to 5 to achieve the coverage target then was reduced down to 3. This is a normal trend of the optimization - adding more detectors than necessary then reducing down to the optimized layout.
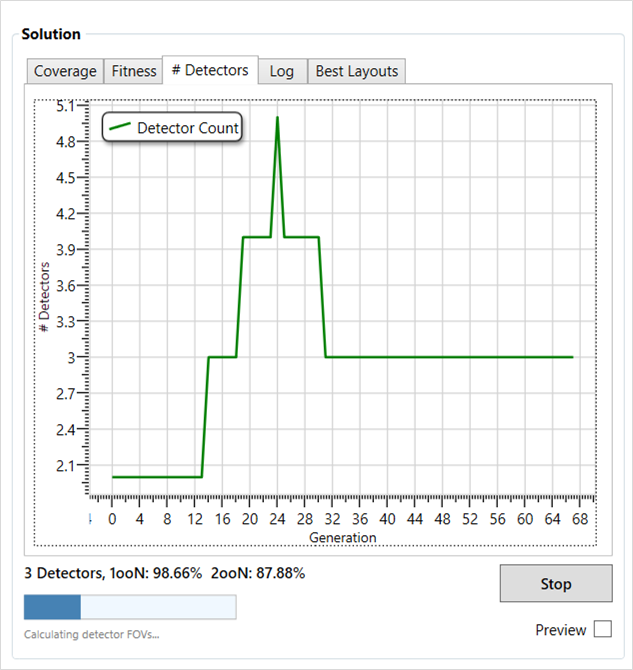
Tutorial 12 - Figure 23 - Chart displaying detector count for the generations of the simulation
-
Click on the Coverage tab and use the dropdown menu on the top-right to select Sub-Zone 01. Here it is seen that the 2ooN coverage (red line) was not achieved until around generation 25 with the five detectors, then slightly decreases as the algorithm determined a device could be removed while maintaining the target of above 85% 2ooN coverage.
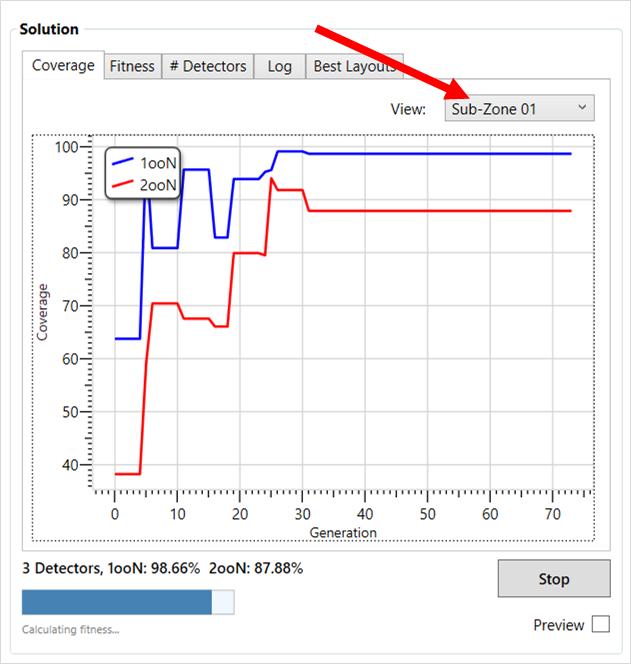
Tutorial 12 - Figure 24 - Chart displaying the 1ooN and 2ooN coverages of each generation in the optimization simulation.
-
Export the coverage history by right-clicking on the graph and selecting Export to Excel. Once the spreadsheet is saved, open it and click through the worksheets to view the data.
-
Add the detectors to the project by selecting the Best Layouts tab and clicking ADD to Project.
Congratulations – you have performed your first multi-target optimization simulation!
Continue to experiment with the optimization settings, and be sure to read through the Example Setups for Common Scenarios section, to see how to optimize an existing flame detector layout.
When you have finished viewing the results close the project.